Due to its popularity and ease of use, Zoom.us has been a commonly used platform for podcast recording. The downside was that Zoom’s audio quality has not been great. Even though other platforms like Riverside.fm offered superior recording quality, some people simply felt more comfortable with Zoom. Fortunately, Zoom has stepped their game up for podcasters by introducing Zoom High Fidelity Audio.
What is Zoom High Fidelity Audio?
According to Zoom:
This option in Advanced Audio enhances “Original Audio” mode, allowing for disabling echo cancellation & post-processing, while raising audio codec quality to 48Khz, 96Kbps mono/192kbps stereo for professional audio transmission in music education and performance applications.
In other words, you can get much better audio recording quality from Zoom for your podcast by changing some simple settings.
How Do I Enable Zoom High Fidelity Audio?
To get the best podcast audio from Zoom, go to Settings > Audio.
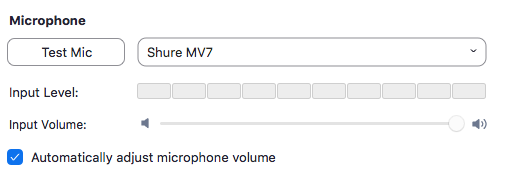
First, ensure your microphone is selected.
Next, under Audio Profile, select “Original sound for musicians“. Then, tick to enable “High fidelity music mode” and be sure that Echo cancellation and Stereo audio are NOT ticked. See photo below.

Bonus: While in settings, also go to Recording and ensure the “Record a separate audio file for each participant” option is ticked. This will give your podcast editor more flexibility to produce the best sound, and be able to fix things like talk-overs or movement noises on one track while the other person is speaking.

In our initial tests, Zoom’s High Fidelity Audio was definitely better, though still slightly below the offerings from other podcast recording platforms.
The Best Zoom Audio Settings for Podcasters
Zoom is commonly used for video conferencing and meetings where audio isn’t the priority. There are often multiple speakers, lack of headphones, no professional microphones, etc. For this reason, Zoom incorporates some default processing and settings to help provide the best experience in those situations. This includes noise suppression, automatic volume adjustments, and echo cancellation.
While this may seem good in theory, it is not for podcasters. Since these settings are all automatic and not dialed in specifically for your situation, they will never perform well compared to what a skilled podcast editor can do. And, once the Zoom audio is recorded with these settings enabled, there’s no undoing it.
For podcasting, the best thing you can do is get the cleanest possible raw recording. That gives you ultimate flexibility in editing. This is where the “Original Sound” option comes in. This allows you to bypass all of Zoom’s automatic settings and get a clean recording.
After selecting the settings shown above, you’ll now see the option in your meeting to enable the Original Sound mode. It’s shown in the top left corner, and you must turn it on for it to actually work! You can click to toggle it on and off.

You can turn this mode on during your podcast recordings, and feel free to turn it back off during your normal day-to-day Zoom use.
Getting Awesome Guest Audio
Your guest will need to take these same steps if you want to benefit from Zoom’s High Fidelity Audio on their recording. Otherwise, only your voice will be recorded with this higher quality.
We recommend providing the guest with a prep sheet (found below). When starting the call and before recording, walk them through the steps to setup Original Sound in their audio settings and then enable it at the top of the meeting window if it isn’t already on.
Important Details About Zoom’s Audio Settings
When changing any settings like this, the time to do so is not five minutes before your interview with that super-hard-to-get high-profile guest.
Make these adjustments when you have time to test it out with a friend by doing a test call. Check the recording, have your editor take a look, make sure everything is looking and sounding good. The last thing you want is to get into a scheduled podcast interview and encounter problems, or find out that the recording is junk.
Things to Keep in Mind
- It is ESSENTIAL that both you and the guest are wearing headphones.
- It’s always recommended to use a wired internet connection (both you and the guest) when conducting interview recordings. This is sometimes a challenge, but using WiFi can lead to dropouts and other issues. High fidelity audio will be even more bandwidth-intensive, so it may cause problems where there were none before. If you hear audio dropouts during your interviews, have the guest switch back to normal audio mode.
- Provide your podcast guests with a prep sheet ahead of time. This will let them know what they’ll need and what settings to adjust to achieve optimal audio quality with Zoom High Fidelity Audio.
- It can’t be overstated how much of an improvement can be achieved by using even headphones with a built-in mic. Commonly, guests will not own a professional mic. However, they may have a set of iPhone headphones. Avoid using a computer’s internal microphone for any guest.
That’s it! Now you know how enabling Zoom’s High Fidelity Audio can help you get the best possible audio quality for your podcast recordings, while sticking with the platform that you know and love.
Note: High fidelity audio isn’t available on Zoom’s mobile apps at present time.
Get a free prep sheet to help prepare your podcast guests for optimal Zoom audio! Just fill out the form below.